
If you’ve been through the renovation stage you will vouch for the fact that you have one room that ends up becoming the room for everything.
Our living room became a living space, kitchen, storage room, home office, all and one at the same time. It was the last room on our hit list, and arguably one of the most important to get right. A living room is one of the most used rooms in our house (once you minus sleep time!) and it really has to feel cosy, warm and inspiring to be in.
After having plastic on the windows and no heating for winter, anything was an improvement lol. This room had to be completely gutted, but we were able to save a few key details in the room which I was adamant to do.
If you like coastal inspired spaces or want to see the process, or just skip to those good after photos, keep on reading.
1940’s Coastal Living Room Makeover – Before + After Photos
1940’s Before – Our Starting Point
Dated, but it had great bones was the sentiment for this room. It’s a dual aspect, south and north facing living room which really is the best of both worlds. Intensely sunny during the height of the sun, but perfectly balanced by the darkness of the other end of the room.
It hadn’t been decorated for a large number of years, no central heating system (gas) and a myriad of pipes going around the perimeter of the room.
I really do try to restore original details in projects when possible. Unfortunately the coal fireplace was beyond repair, and coal is actually not available for sale in the UK anymore, so this had to be removed. However, we discovered real oak flooring, which whilst it looked beyond repair, we were adamant to try and restore.
The fitted cabinet unit was also the first thing you see as you enter the room, and I knew it had to stay. The joinery work was beautiful and would have cost a lot to create years ago, I managed to keep the bare bones of this, refreshing it to be on-trend for today.
If you like this kind of before and after project, I have a full post on our coastal bathroom makeover too!


What We Did
Much like every room in our house, this was a skeleton job!
Wallpaper was stripped, most of the walls were crumbling, requiring new render and plaster, new windows went in, and despite wanting to retain the original flooring, we had no choice but to rip up planks on either side of the room for the new heating system to be plumbed in. This meant that eventually we could rip out all the old lead pipes which were leaking and surrounding the ceiling in the room (see below!).

We did however keep these planks to the side and through meticulous work managed to put them back into place, albeit not perfect, but it meant we could restore the rest of the floor to its former glory, and my gosh was it worth it!
The fireplace had to be removed, but we made way for something better and which would actually serve a purpose in heating the home over winter. The fireplace had to be widened and a lintel inserted to support the chimney breast. I started to get very excited when it revealed the curve, unfortunately this wasn’t the whole way along so couldn’t be kept.
We eventually got this rendered, plastered, tiled, sprayed and had a log burner fitted.


During this process, we also had to send off ceiling samples for an asbestos test (luckily came back negative!) and new electrics were wired in.
This entire process above which led us to the final decorating stage took months to complete as this was the very last room in the entire house that could be completed. Painful, but so worth it!
It was then time to pull the space together, decorate and style it, which might I add is always an ongoing thing as I’m still always on the look out for new vintage pieces to add into the room.

The After – Coastal Inspired Living Room
Let’s have a look around the new living room! I drew from a lot of coastal and earthy inspired inspiration for this room.

I knew a light baby blue would be the main base colour in this room for me. Bright, breezy blues are as good as versatile neutrals and it leans into the coastal side of things whilst elevating the room.
The blue used here is The Good China by Coat, with Jo Jo’s White on the upper half of the walls and ceiling. This is a perfect creamy, off-white which is warm, and creates a fabulous neutral backdrop.
We reworked the shelves behind the sofa, providing the perfect log store for our new burner. I brought a tactile feel into the living room with a large Benuta wool rug underfoot and brought in terracotta, rusty red tones on the textiles to add some warmth against the cooler tones.
The side table was a Facebook Marketplace find, I adore the twisted barley legs, adding such interest and depth to the piece. I painted it in Eating Room Red by Farrow and Ball which really plays on the ‘unexpected red theory’.

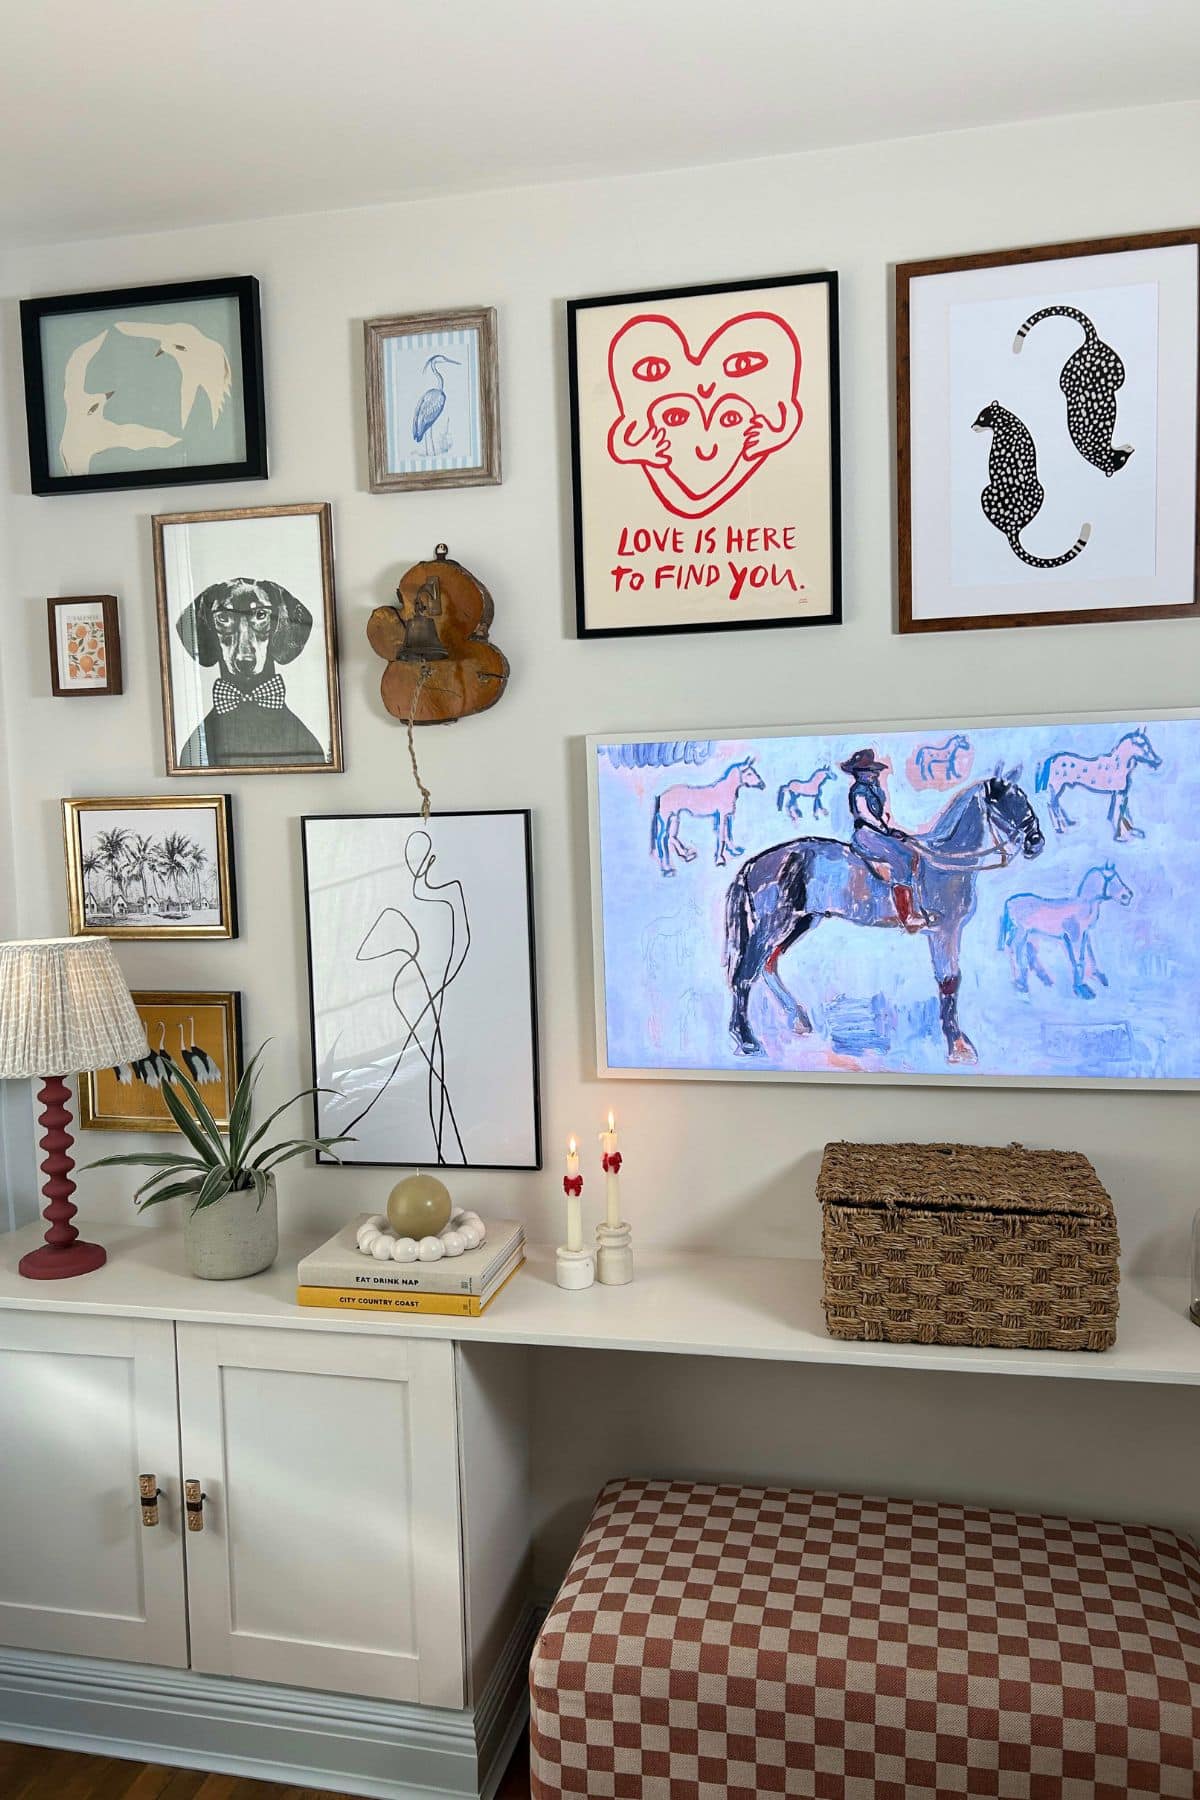
My favourite transformation, and one of the easiest was reworking this bespoke built in! I adored that scallop detail on the top and I removed the upper doors and glass fronts for a modern feel. We added fresh shaker style panelling to the bottom doors and added these sweet rattan handles from Home Luxe Co.
The real star of the show is the paint colour here, and one I get asked for all the time on Youtube! This is De Nimes, Farrow and Ball. It has a beautiful metamorphic quality to it, appearing like a blue or a grey depending on the light you view it in.
I love the 9 vignette opportunities here, a perfect balance between size, form and vintage items to create beautiful visual impact as you step into the space.

Another view of the space with our completed restored flooring. I am so beyond happy with the outcome of this, we finished the flooring in a natural oak stain and clear varnish to retain the quality over time.
It was a full weekend of work, but one we are so pleased we did. All in it cost £120 to restore.

This gallery wall was a labour of love and one I adored putting together. There’s an age old debate about having a TV on display in a living room, whether you should have one on show and how to conceal it.
The Samsung Art Frame TV was on the top of my hit list as I love how flat the screen is, lending itself to a piece of artwork when not in use. I used this as the anchor point in my design and built out from this, with a coastal inspired theme in mind.
We built the shelf and cabinet into place here, finishing the room with Georgian MDF skirting and Scotia. We added the Scotia detail more to hide some of the joins on the flooring, but I love how finished it makes the room look.
The main focal point as you step into the room is our brand new log burner. Not only does it look amazing, but it makes the room so cosy, I have adored having this on during the cold winter.
The mirror was handed down from my partners mum and the bejmat terracotta tiles are from Otto Tiles. A bit of a splurge, but it’s such a small section that it wasn’t too eyewatering in cost. It plays on the natural elements I have tried to use throughout the room for a really relaxed, yet stylish feel.
Over time the styling will change and I will add more as I find the perfect pieces I am looking for, but I am so happy with the finished result and it just feels good to be in this space. More details all linked below from the space:
- Bobbin Table Lamp (painted in Eating Room Red – Dunelm
- Lampshade – Dunelm
- Samsung Art Frame TV Artwork – Ewen Studio
- Livie Sofa – DFS
- Pouffe Blenets Check Mini Fabric – Harlequin (Henry Holland)
- Bell in gallery wall – eBay


What do you think of our living room makeover? Watch the full before video and start of the makeover on my YouTube channel below.